How to Fix iPhone 13 Connected to Wi-Fi But No Internet
 Jerry Cook
- Updated on 2021-11-19 to Fix iPhone
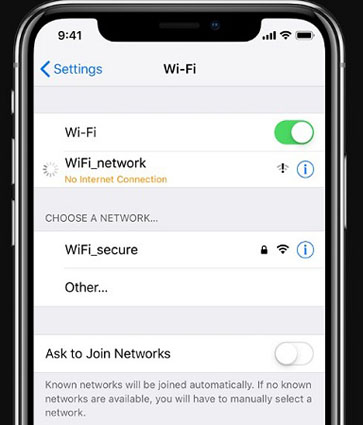
With exclusive features such as the brand new cinematic mode and the latest A15 Bionic chipset, the iPhone 13 is a powerful and widely useful innovation by Apple. However, this doesn’t mean that the iPhone 13 is safe from different errors. Recently, many iPhone 13 users went online and complained about the iPhone 13 connected to wifi but no internet. Either users are unable to connect their device to a Wi-Fi connection or can’t get the Internet to work even when the device is connected to Wi-Fi.
If you are facing a similar situation, this guide will help! In today’s article, we’ll walk you through different solutions that’ll help you troubleshoot Wi-Fi not working on iPhone and get a working Internet connection.
- Part 1. Why is Internet Not Working Even Though Connected to Wi-Fi
- Part 2. 13 Ways to Fix iPhone 13 Connected to Wi-Fi But No Internet
- Part 3. One-Stop Solution to Fix Wi-Fi/Internet Not Working on Any iPhone[No Data Loss]
Part 1. Why is Internet Not Working Even Though Connected to Wi-Fi
In the majority of the cases, the Wi-Fi router will be the root cause for your iPhone 13 not getting any Internet connection even when it’s connected to Wi-Fi. Either the router has experienced some physical damage or there is a problem with the backend itself. But, in some situations, the iPhone’s network configurations can also trigger this error. If you have manipulated the network settings or installed a random third-party application, it’s quite possible that you may fail to connect to Wi-Fi properly.
In any case, however, you can implement different solutions to fix the iPhone 13 connects to wifi but no internet issue and connect to the Internet instantly.
Part 2. 13 Ways to Fix iPhone 13 Connected to Wi-Fi But No Internet
Fix 1. Move Closer to Wi-Fi Router
It’s worth noting that Wi-Fi will only work on your device if it’s within the router’s range. Each router has a different range beyond which it doesn’t transmit the radio signals. So, if you are sitting too far from the router, the first step would be to come closer and then try connecting to the Internet. In case there is still no Internet connection on the iPhone, move towards the next solution.
Fix 2. Reboot Your iPhone and Wi-Fi Router
Now, there might be a temporary hardware glitch with your iPhone or the Wi-Fi router. In this case, all you have to do is reboot both devices. This will restore the network connectivity and you’ll be able to connect to the Internet without any hassle.
Fix 3. Turn On/Off Wi-Fi on iPhone
If the iPhone is still not connecting to the Internet even when there’s a Wi-Fi connection available, you can also try switching off the Wi-Fi feature on the device itself. You can turn off the Wi-Fi from the Control Center, or use the “Settings” menu to get the job done.
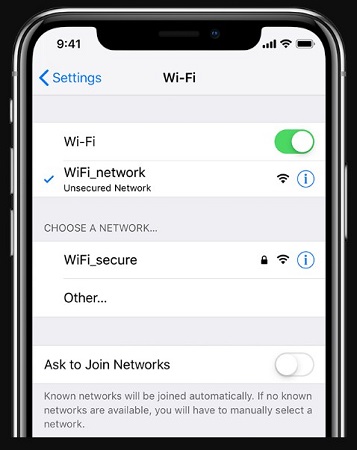
Simply go to “Settings” on your iPhone, click on “Wi-Fi” and then toggle the switch next to Wi-Fi to turn it off. Wait for a few minutes and then connect to the Wi-Fi again to see if it starts working or not.
Fix 4. Disable/Enable Airplane Mode
Enabling the Airplane mode is another effective way to troubleshoot the Wi-Fi connectivity on your iPhone 13. When you enable the Airplane mode, your device will disconnect from all networks and reset the network configurations. So, if a network-related error is triggering the Wi-Fi issue, you’ll be able to restore the Internet connectivity on your device easily.

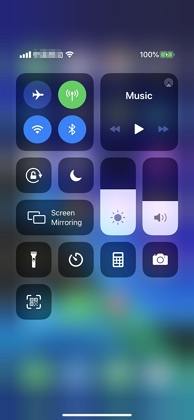
To enable Airplane mode on your device, swipe up on the home screen to bring up the Control Center. Then, click the “Airplane Mode” icon to enable the feature. Then, wait for a while and again tap the icon to disable Airplane mode and restore Wi-Fi connectivity.
Fix 5. Forget and Reconnect Wi-Fi
Enabling the Airplane mode is another effective way to troubleshoot the Wi-Fi connectivity on your iPhone 13. When you enable the Airplane mode, your device will disconnect from all networks and reset the network configurations. So, if a network-related error is triggering the Wi-Fi issue, you’ll be able to restore the Internet connectivity on your device easily.
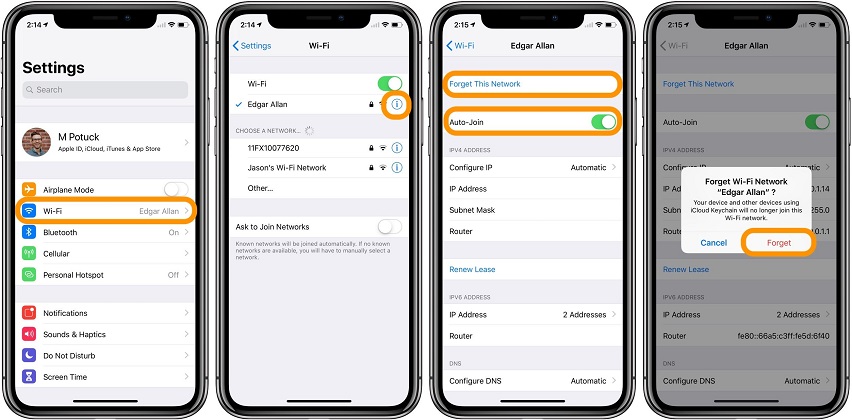
You can also forget the Wi-Fi on your device to troubleshoot the error. However, before proceeding with this solution, make sure that you remember the Wi-Fi password. To forget a Wi-Fi network, open the “Settings” app and click “Wi-Fi”. Then tap the “i” icon next to the Wi-Fi name and then click on “Forget This Network”. After this, tap the Wi-Fi name again and enter the password to establish a connection with the router.
Fix 6. Disable/Enable Location Services
In some situations (mainly in a few countries), you are only allowed to connect to a Wi-Fi connection if the location services are enabled. So, if you have disabled location services on your iPhone, make sure to enable it and check if you are able to connect to the Wi-Fi or not.
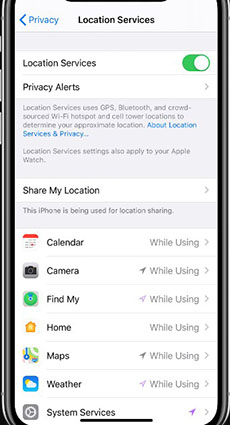
You can enable/disable location services by going to the “Settings” menu and tapping on “General”. Tap on “Location Services” and toggle the switch on to enable the feature. On the other hand, it’s also important to understand that you might not be able to connect to Wi-Fi in a few regions if location services are enabled. In this situation, you’ll have to disable the feature to troubleshoot the error.
Fix 7. Switch Off Wi-Fi Assist
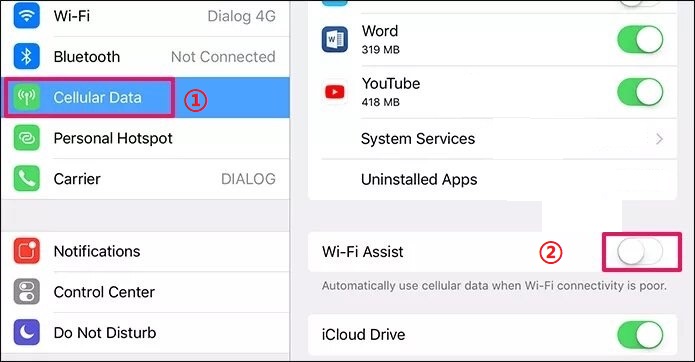
Wi-Fi assist is an exclusive iOS feature that automatically switches your device to the cellular network if the Wi-Fi is not working properly. While it’s a quite handy feature, it can also cause the “iPhone not connecting to the Internet” error. So, you would want to keep “Wi-Fi assist” off if you are unable to get an Internet connection even after connecting to Wi-Fi. To do this, go to “Settings” and click on “Cellular”. Then, tap the “Wi-Fi Assist” option to turn the feature off.
Fix 8. Disable VPN
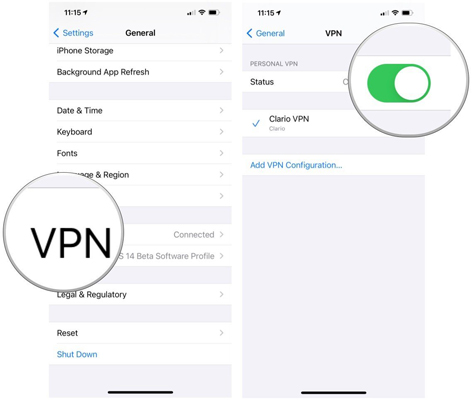
Another reason behind no internet connection on iphone is VPN. If you usually keep your device connected to a VPN tool, it might be the real culprit behind the said network error. So, make sure to disable the VPN on your iPhone. Simply go to the “Settings” app and click on “General”. Scroll down and tap the “VPN” option. In case there’s a VPN service listed here, turn it off and try connecting to the Wi-Fi again.
Fix 9. Change Wi-Fi Name
In many situations, the Wi-Fi not working error can also be triggered when you have used a relatively complicated name for the Wi-Fi. In general, when there are too many unrecognizable characters in the Wi-Fi name, the device may fail to connect to it properly. So, go ahead and rename the Wi-Fi using a single name.
Fix 10. Check Date & Time Settings
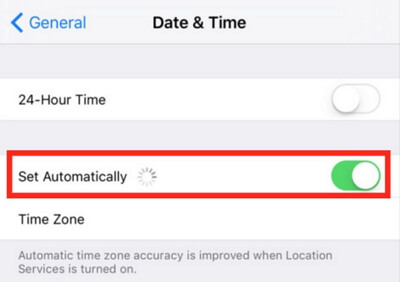
As surprising as it may sound, incorrect date and time can also restrict you from connecting to a Wi-Fi network. In general, iPhone 13 is configured to automatically set the date and time based on the user’s current location. However, if you have changed these settings to manual, the data and time might be inaccurate. In this situation, you’ll have to manually change both date and time or reconfigure the device to set them automatically.
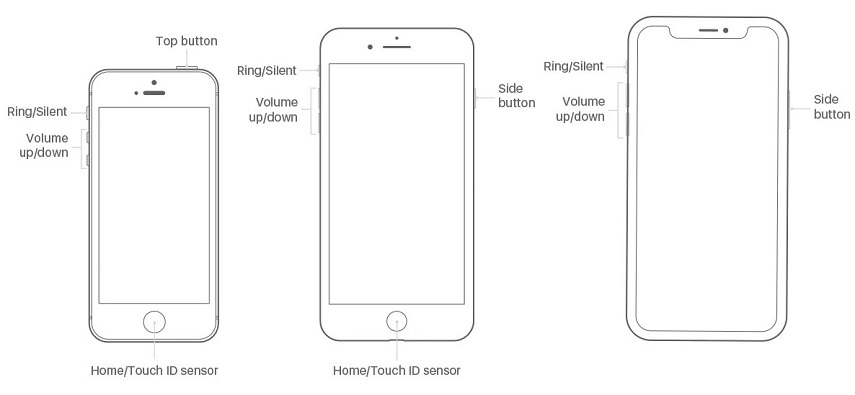
Here’s how you can put your iPhone 13 and iPhone 13 Pro (Max) in recovery mode.
- Step 1: Open the “Settings” window and click “General”.
Step 2: Click on “Date & Time” and enable the “Set automatically” option by toggling the switch.

Now, reboot your device and try connecting to the Wi-Fi again.
Fix 11. Reset Network Settings
Resetting the network settings is also a great way to troubleshoot the Wi-Fi not working on iPhone error. Simply follow the below-mentioned steps to reset the network configurations on your device.
- Step 1: Open the “Settings” app and click “General”.
- Step 2: Then, tap “Reset” and click the “Reset Network Settings”.
Step 3: In the prompted pop-up, again click the “Reset Network Settings” option. You may have to enter the screen passcode to complete the process.

Now, let the device reboot normally and you’ll be able to connect to the Wi-Fi without encountering any errors.
Fix 12. Update iPhone Software
Now, if you want to avoid such unexpected errors, it would be important to install the latest iOS version on your device. Even if you have bought the iPhone 13, make sure to keep updating it frequently so that you can access all the iOS features without any hassle.
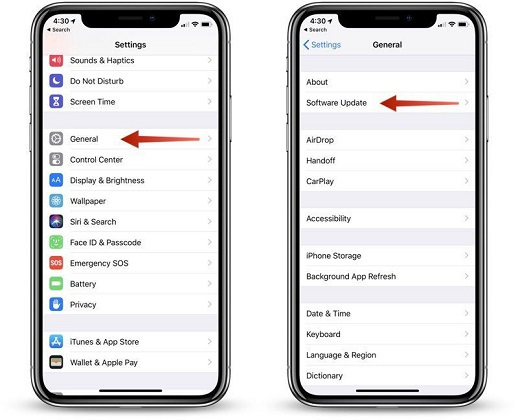
To update your iPhone 13, click “Settings” and tap on “General”. Then, click “Software Update” and let your device search for the latest iOS updates automatically. In case there are any pending software updates, your device will download and install them automatically.
Fix 13. Reset Your iPhone to Factory Settings [Data Loss]
Finally, if none of the above-mentioned solutions work, go ahead and reset your iPhone 13 to the default factory settings. However, you should only proceed with this method if you don’t have any important files on your device. Why? Because resetting the device to factory settings will erase everything from the device and you won’t be able to recover it at all.
Follow these steps to reset your iPhone to default factory settings.
- Step 1: Again, open the “Settings” window and click “General”.
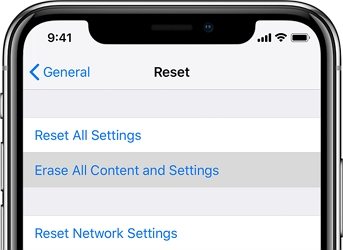
Step 2: Click the “Reset” tab and then tap on “Erase All Content and Settings”. Follow the on-screen instructions to complete the process.

Now, let the device reboot normally and you’ll be able to connect to the Wi-Fi without encountering any errors.
Part 3. One-Stop Solution to Fix Wi-Fi/Internet Not Working on Any iPhone[No Data Loss]
Now, if your iPhone 13 connected to wifi but no internet problem still persists and you don’t want to deal with data loss either, we recommend using UltFone iOS System Repair. It’s a professional iOS system recovery tool that’s designed to troubleshoot 150+ system errors on any iDevice. It doesn’t matter if your iPhone 13 is stuck at the black screen or can’t get past the Apple logo during boot, UltFone iOS System Repair will fix the problem and help you regain access to the device immediately.
You can also use the tool to troubleshoot different network-related errors such as the Wi-Fi not working. The biggest key feature of UltFone iOS System Repair is that it doesn’t cause any data loss. You’ll be able to repair the unresponsive Wi-Fi without losing even a single file from your device.
Some of the additional features of UltFone iOS System Repair include:
- 1-Click to enter or exit recovery mode on your iPhone.
- Troubleshoot 150+ system errors on your iPhone/iPad using a single solution.
- Reset your iPhone or iPad without password.
- Compatible with all iPhone models and iOS versions.
Here’s the detailed step-by-step process to fix the Wi-Fi not working on iPhone error using UltFone iOS System Repair:
-
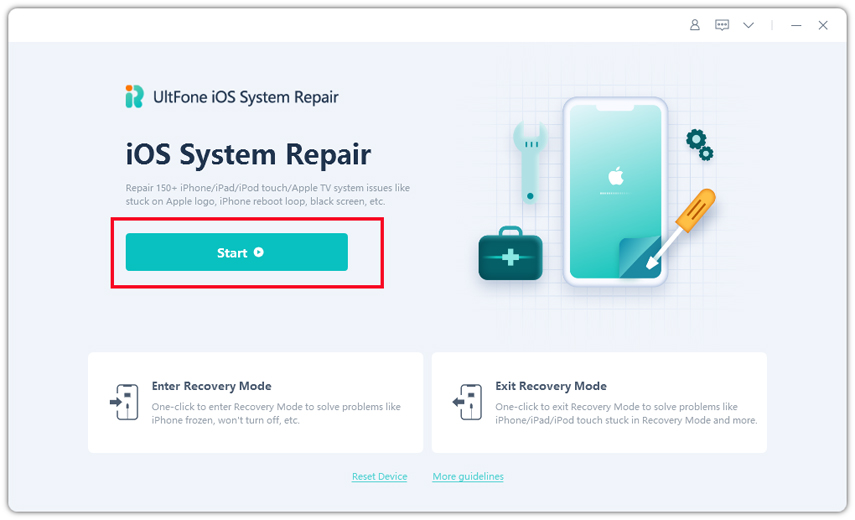
Step 1 Download and install UltFone iOS System Repair on your computer. Then, launch the software and click the “Start” button to get started.

-
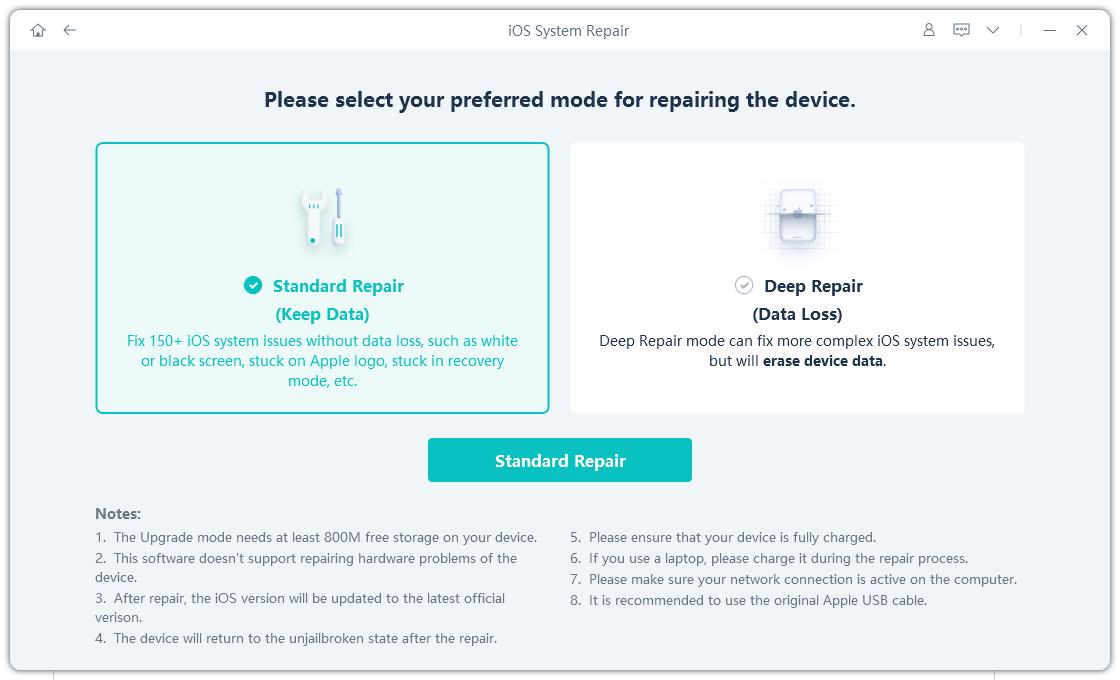
Step 2 Now, connect your iPhone 13 to the computer and click “Standard Repair” to proceed further.

-
Step 3 On the next screen, choose a destination folder and click the “Download” button to download the appropriate firmware package for your device.

-
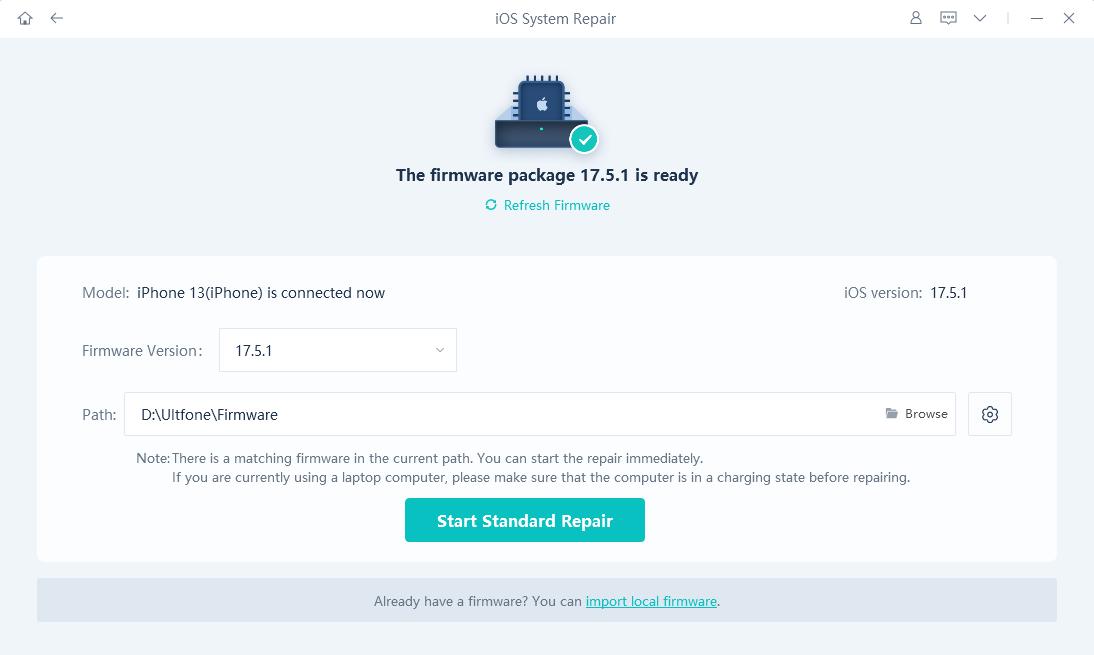
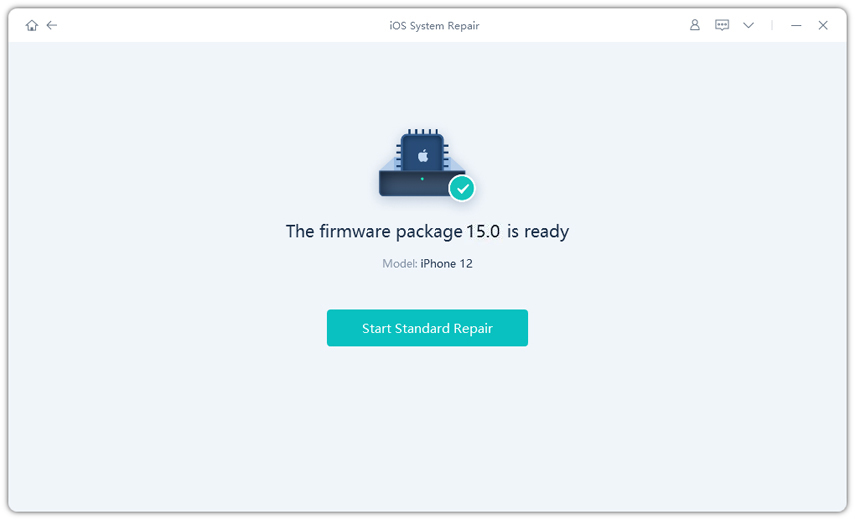
Step 4 Once the package is successfully downloaded, click the “Start Standard Repair” button to initiate the repairing process.

That’s it. Once the tool has repaired your device, you’ll see a confirmation message on your screen and will be able to connect to the Wi-Fi instantly.
Conclusion
Apple’s iPhone 13 is a remarkable piece of hardware that comes with a plethora of exciting features. But, errors like Wi-Fi not working on iPhone 13 can easily ruin the overall user experience for the customer. If you are facing the same situation with your iPhone 13, try the above-mentioned solutions to troubleshoot the Wi-Fi not working issue. And, in case if nothing works, go ahead and install UltFone iOS System Repair to get the problem fixed quickly without any data loss.


