[FREE] 6 Ways to Transfer Photos From iPhone to PC Wirelessly
 Jerry Cook
- Updated on 2024-09-03 to Transfer
Are you tired of the USB cable shuffle when trying to transfer photos from iPhone to PC wirelessly? Fret not, for we have the answer. In this article, we'll unlock the secrets of how to transfer photos from iPhone to computer without USB, simplifying the process for good.
Explore these best ways, from harnessing Bluetooth to utilizing the power of iCloud, that make wirelessly transferring photos from your iPhone to both your computer and laptop a breeze. Say goodbye to cables and hello to seamless image sharing.
- Part 1: Free Way to Transfer Photos From iPhone to PC Wirelessly [Best & Easiest]
- Part 2: Airdrop Photos from iPhone to Mac Wirelessly
- Part 3: Transfer Photos from iPhone to Computer Without USB via iCloud
- Part 4: Send Pictures from iPhone to Computer Without USB with Email
- Part 5: Transfer Photos from iPhone to Laptop Wirelessly with Google Photo
- Part 6: Get Pictures from iPhone to Computer Wirelessly via Bluetooth
Part 1: Free Way to Transfer Photos From iPhone to PC Wirelessly [Best & Easiest]
What is the best free tool to transfer pictures from iPhone to computer wirelessly? UltFone iOS Data Manager - Your Best Companion for Wireless Photo Transfer from iPhone to PC. In the quest for the best and easiest way to transfer photos from your iPhone to your PC wirelessly, UltFone iOS Data Manager emerges as the ultimate one-stop solution. With its intuitive features and remarkable capabilities, this iOS file manager is your go-to choice for seamless photo transfer.
Key Features of UltFone iOS Data Manager :
- Wireless Photo Transfer: Seamlessly transfer photos from iPhone to PC via Wi-Fi.
- High-Speed Transfers: Lightning-fast transfer speeds without USB cables.
- No Storage Limit: Support for multiple and large photos with no storage restrictions.
- Complete Data Management: Manage photos, contacts, music, files, and apps with ease.
- Selective Restore: Preview and restore only the desired files.
- User-Friendly Interface: Simplify complex operations for effortless iOS data management.
Here is how to transfer photos from iPhone to PC wirelessly for free:
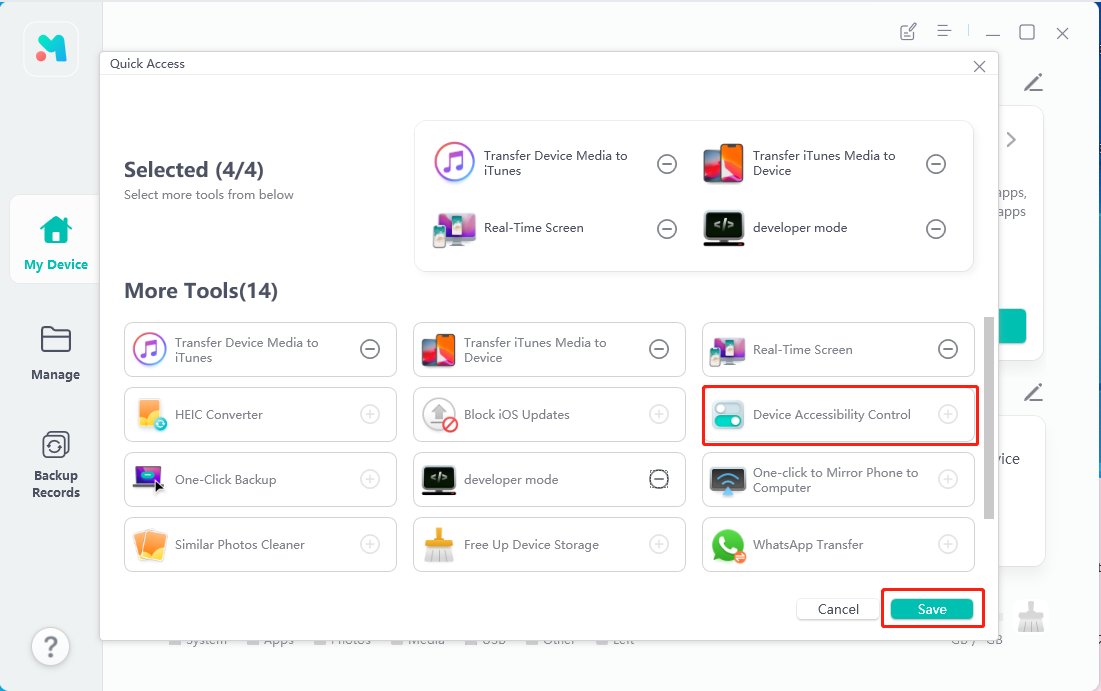
- Step 1 Download and install UltFone iOS Data Manager. Find this tool, "Device Accessibility Control" in Quick Access and enable Wi-Fi connection (automatic Wi-Fi connection to computer). Connect your iPhone and the computer to the same WiFi, then your iPhone will automatically connect to the computer.
-
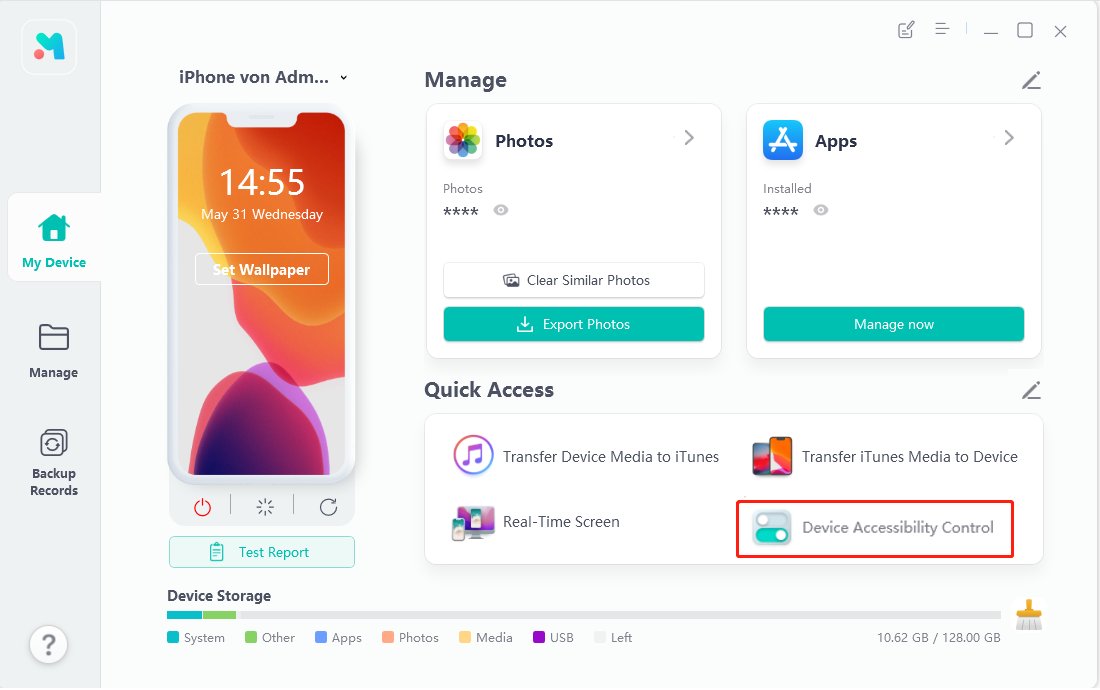
If you can't find it here, click the button on the right of Quick Access, enter More Tools page and set this tool to Selected.
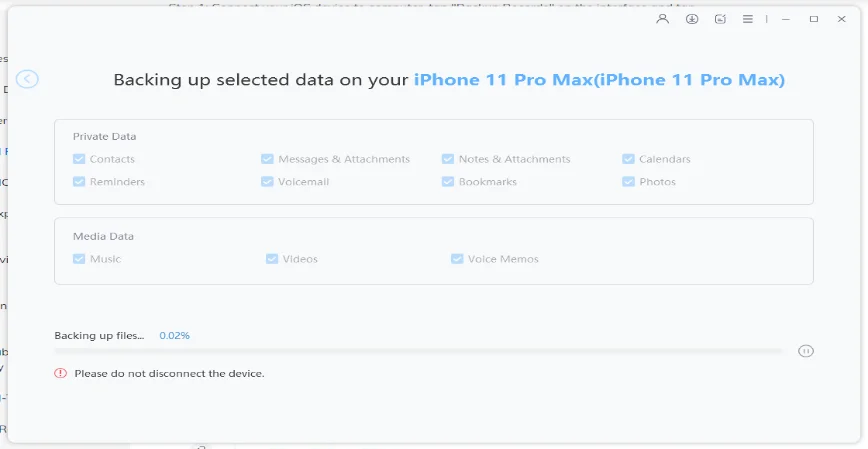
- Step 2 Click "Backup" button to back up and transfer your photos from your iPhone to PC wirelessly.
- Step 3 Congratulations! The wireless transfer from iPhone to PC is successful. You can check your photos on your computer now.


Part 2: Airdrop Photos from iPhone to Mac Wirelessly
With the innovation of AirDrop, Apple has made sharing photos and videos between your iPhone and Mac a breeze. Imagine effortlessly transferring your cherished memories in just a few simple steps.
Step 1: Open the image or multiple photos in the Photos app that you wish to transfer.
Step 2: Tap the share icon in the bottom left corner.
Step 3: Choose AirDrop from the options provided.
Step 4: Select your Apple device from the menu.
Step 5: Witness the magic as the status changes from "Waiting" to "Sending" and finally "Sent".
Step 6: Tap "Done" and revel in the simplicity of wireless sharing.

Pros:
- AirDrop is a straightforward and cable-free method for sharing photos and videos without additional software or complex setup.
Cons:
- AirDrop's 30-foot range can be limiting, especially in scenarios where devices are not in close proximity.
- Users may encounter connectivity problems, disrupting the seamless transfer of data.
- Airdrop not showing up in the Control Center can be a common issue requiring troubleshooting for resolution.
Part 3: Transfer Photos from iPhone to Computer Without USB via iCloud
iCloud is the ultimate choice for iOS users to securely and wirelessly send photos from iPhone to PC. Explore the step-by-step process for seamless photo transfer
Step 1: Open your iPhone's Settings.
Step 2: Select [your name], go to iCloud, and then choose Photos.
Step 3: Enable the iCloud Photos toggle to sync your iPhone photos to iCloud.

Step 4: Navigate to iCloud.com on your computer and sign in to your account.
Step 5: Choose the 'Photos' option once you're signed in.
Step 6: Select the specific photos you wish to download to your computer, then click 'Download'.

Pros:
- iCloud allows wireless photo transfer, eliminating the need for USB cables.
Cons:
- The free 5GB may quickly fill up, necessitating paid storage.
- Some users may have privacy concerns about their data stored in the cloud.
- iCloud requires a stable internet connection, which can be limiting in areas with poor connectivity.
Part 4: Send Pictures from iPhone to Computer Without USB with Email
Effortlessly transfer photos from iPhone to Windows PC without iTunes or iCloud using email. A simple solution to send pictures from iPhone to computer without USB.
Step 1: Start by opening the Mail app on your iPhone.
Step 2: Choose the email where you want to add the photo, then tap the 'Expand Toolbar' above the keyboard.
Step 3: Tap the picture icon to attach a photo from your selection to send to your Windows PC.
Step 4: After selecting the photo, tap the arrow icon to initiate the email transfer from your iPhone to your email account.
Step 5: On your Windows computer, log in to your email account and download the attached iPhone photos to your computer.

Pros:
- This method is incredibly easy to use and doesn't require app installations or USB cables.
Cons:
- It's not suitable for transferring large numbers of high-resolution (4K) photos.
- There are limitations on attachment size, with Gmail allowing 25MB and Outlook/Hotmail allowing only 10MB.
Part 5: Transfer Photos from iPhone to Laptop Wirelessly with Google Photo
Google Photos is a versatile platform for wireless iPhone-to-Windows photo transfers. Ideal for seamless backups and cross-device accessibility, it simplifies data sharing without USB cables.
Step 1: Launch Safari on your iPhone and navigate to photos.google.com.
Step 2: Log in by using your Google account details.
Step 3: Click on 'Upload,' select 'iPhone,' and then choose 'Photos library.' Pick the photos you want to transfer from your iPhone to your Windows computer.
Step 4: Download your iPhone photos from photos.google.com to your Windows PC. On your computer, select the desired pictures, click 'More,' and choose 'Download' to save your photos.
Pros:
- Google Photos provides ample free storage space, accommodating a vast collection of photos and videos.
- Google Photos automatically syncs photos and videos from your iPhone when connected to the internet, ensuring your data is always up to date.
Cons:
- It may lack flexibility in deleting and managing iPhone photos, with certain features being less intuitive.
- Google Photos is primarily integrated with Android phones and tablets, potentially limiting its compatibility with iOS devices.
Part 6: Get Pictures from iPhone to Computer Wirelessly via Bluetooth
Transferring iPhone photos to a computer wirelessly via Bluetooth can be challenging, particularly with a large photo collection, without the use of USB cables.
Step 1: On your iPhone, access Settings and enable Bluetooth.
Step 2: Similarly, enable Bluetooth on your Windows PC and make both devices discoverable.
Step 3: On your iPhone, go to the Bluetooth menu and search for nearby devices.
Step 4: Click your Windows PC's name to establish a Bluetooth connection.
Step 5: In your iPhone Gallery, select the desired pictures for transfer.
Step 6: Share these selected pictures over Bluetooth.
Step 7: Be prepared to approve the incoming transfer on your PC.

Pros:
- Bluetooth allows for a wireless connection, eliminating the need for USB cables.
Cons:
- This method can be time-consuming, especially for transferring many pictures, requiring manual selection for each one.
- It's not well-suited for sending a significant quantity of pictures to your PC due to the manual selection process.
Conclusion
While there are different methods to transfer photos from iPhone to PC wirelessly, they each come with pros and cons. For a comprehensive and hassle-free solution, UltFone iOS Data Manager stands out as the ultimate tool. Its seamless wireless transfer, robust file management, and efficient backup capabilities make it the ideal choice for iOS users seeking simplicity and efficiency in managing their data. Say goodbye to complexity and embrace the user-friendly features of UltFone iOS Data Manager.
- One click to backup iPhone to computer for free.
- Selectively restore backup to iPhone/iPad.
- Transfer files on iPhone/iPad/iPod to/from computer freely without limitation
- One click to export photos to computer
