How to Transfer Music from iPhone to Computer
 Jerry Cook
- Updated on 2022-01-17 to Transfer File
When you are an iPhone user and fond of listening to music, then the very first question that may arise in your mind is, "Can I transfer music from iPhone to computer"? Well, if you think this way, then you are not alone. Yes, many iPhone users constantly hunt the web to search for the best ways on how to transfer music from iPhone to computer without iTunes free!
Initially, you might find it pretty hard and challenging to transfer songs from iPhone to PC like transferring from iPod to computer but after getting your hands on the correct methods, it's just a piece of cake. So, in this guide, we will teach you how to get music from iPhone to computer in 4 different ways.
- Way 1: One-Click to Transfer Music from iPhone to Computer without iTunes
- Way 2: Transfer Purchased Music from iPhone to Computer Free with iTunes
- Way 3: How to Download Songs from iPhone to Computer
- Way 4: How to Move Music from iPhone to Computer via Cloud Services
Way 1: One-Click to Transfer Music from iPhone to Computer without iTunes
Do you meet any limitations when transferring songs from iPhone to computer with iTunes? iTunes is a great iOS management tool, but at the same time it also has many shortcomings that we cannot bear, such as freezing, errors, transfer failures, etc.
UltFone iOS Data Manager is a great iTunes alternative tool to manage and transfer music from iPhone to PC/Mac without iTunes. Besides purchased songs, it allows you to transfer all songs to computer in a click.
Now, let's check out how UltFone iOS Data Manager works for transferring music from iPhone to computer free without iTunes.
Option 1: Move Music from iPhone to Computer Using "Manage" Feature
The "Manage" feature of UltFone iOS Data Manager allows you to get music from iPhone to computer easily.
- Step 1: Install and run UltFone iOS Data Manager on a PC or Mac.
-
Step 2: Now, connect your iPhone with your computer via a USB cable and choose the "Manage" feature from the top menu.

-
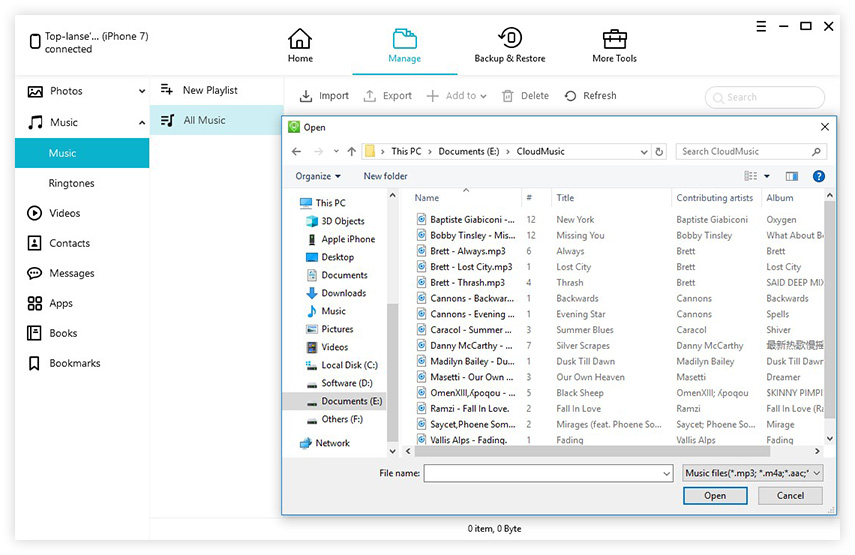
Step 3: Choose Music category from the top menu, and then select Music from the unfold options. All music files on your iPhone will be displayed on the right panel. Choose the song(s) you’d like to export, and click Export button. A window pops up to allow you to choose a local path to save the files.

This option allows you to select those file(s) you need. It is more flexible. There is another option for transferring songs from iPhone to computer in this software.
Option 2: One-Click to Sync Music from iPhone to iTunes Library on Computer
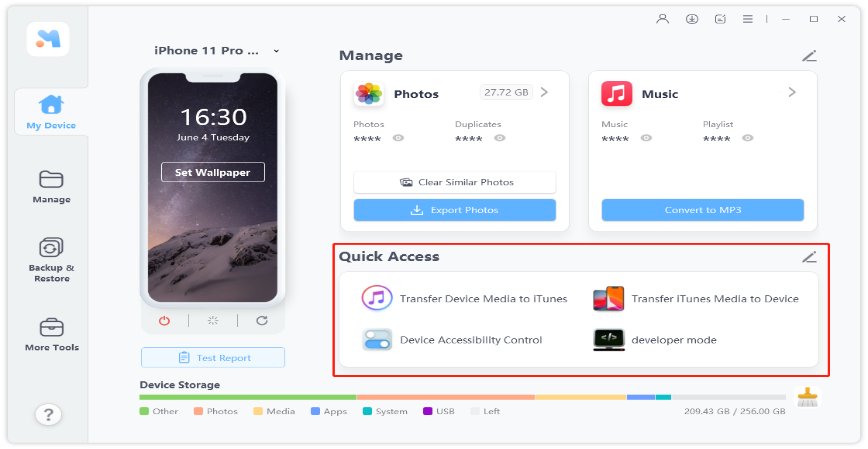
Another way to transfer music from iPhone to iTunes Library on computer via UltFone iOS Data Manager is by using the "Transfer Device Media to iTunes" feature. Have a look at how to use this feature!
On the main interface, select “Transfer Device Media to iTunes”. A window pops up to allow you selecting file types for syncing to iTunes library. Tick the Music and click Transfer button to start moving all songs from iPhone to computer.
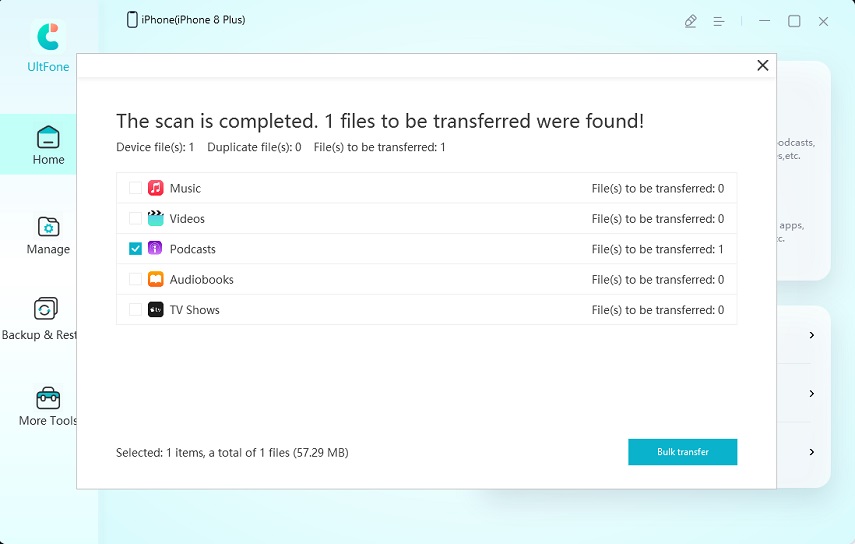
Congratulations!! You have successfully transferred music from iPhone to PC without iTunes in just a few clicks with the help of UltFone iPhone music transfer software.
Way 2: Transfer Purchased Music from iPhone to Computer Free with iTunes
Another way of transferring songs from iPhone to computer is via iTunes. Transferring the music with iTunes is common, but before starting with it, you must know that this method will only be able to move the purchased music to your iTunes. With iTunes, you can easily put the songs on the iPhone, but there is no direct way to import non-purchased songs from iPhone to iTunes.
In addition to this, considering iTunes error may happen at any time, it is always recommended to make a backup first.
Have a look at the below-stated steps on how to transfer music from iPhone to PC with iTunes!
Step 1: Download and run the latest version of iTunes on your PC and connect your iPhone to the PC via USB cable.
Step 2: Tap on the "File" option on the upper left corner of the iTunes window and click on "Devices"> "Transfer Purchases from (Your iPhone Name)."
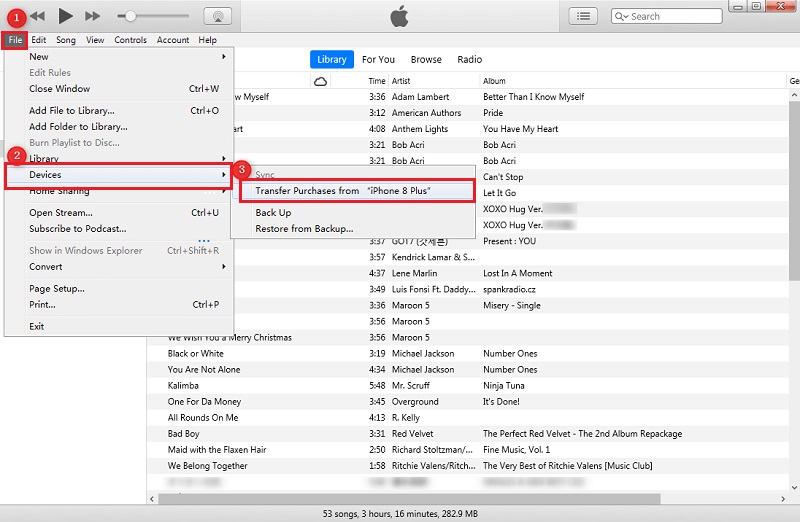
Step 3: Now, if iTunes asks you to authorize your PC, then go to the "Accounts"> "Authorization" and select to Authorize the computer.
Step 4: Here, wait for the purchased music to complete transferring and tap in "Recently Added" on the left side of the iTunes window.
Step 5: Finally, select the purchased song you wish to save and tap on the "Download" button to download the music to PC. In case you don't see the "Download" button, the song is already on your PC.
This is all about how to move music from iPhone to computer with iTunes. Although this method of transferring music from iPhone to computer free works seamlessly but in case you face any issue with this method, then try transferring iPhone music with the next method.
Way 3: How to Download Songs from iPhone to Computer
If you are still searching for how to get music off iPhone onto a computer, then this can easily be done via your Apple ID. Yes, you read that correctly. You can flawlessly download songs from iPhone to computer via Apple ID, but one thing to note here is that this will work only with purchased music.
In short, if the purchased music is what you wish to transfer from iPhone to computer, then you can directly re-download the songs in iTunes Store without even connecting your iPhone to the computer.
Here's a step-by-step guide on how this method works to transfer music from iPhone to computer for free.
- Step 1: Open "iTunes" and navigate to "Account" from the menu bar.
- Step 2: Here, select "Sign In" and enter the credentials of your Apple ID that you used to purchase the songs.
- Step 3: Go to "Account"> "Purchased" and click on "Music."
- Step 4: Now, switch to the "Not in My Library" tab, and here you will see all the purchased items.
-
Step 5: Simply tap on the "Cloud Download" button to save the music to your PC.

It was this hassle-free and quick to transfer music from iPhone to computer freeware via Apple ID. Make sure to follow each step appropriately in order to get the desired results.
Way 4: How to Move Music from iPhone to Computer via Cloud Services
Last but not least, the final way to solve how to move songs from iPhone to computer issue is by transferring the music via Cloud services. Multiple cloud storage services allow the users to share different kinds of files across devices that use the same user account. So, no matter whether you wish to transfer music from iPhone to computer free unlimited or from computer to iPhone, such cloud storage services will help.
Common cloud storage utilities like Google Play Music, Dropbox, and Amazon Music can copy all music from your iPhone to computer or Mac. Let's have a look at Dropbox as an example.
Here's a list of steps on how to transfer music from iPhone to computer free via Cloud services.
- Step 1: Install and run Dropbox on both your computer and iOS device.
- Step 2: Sign in to Dropbox on your device with the same account.
- Step 3: Now, upload the music you wish to transfer from your iPhone to Dropbox.
- Step 4: When completed, you can easily access and download the songs from Dropbox to your computer. By doing this, you can transfer songs from your iPhone to Mac or PC.
That's all! It was just a matter of minutes to free transfer music from iPhone to computer via Cloud Services. Like Dropbox, you can use any other Cloud Service to solve your issue relating to how to get music from iPhone to computer!
Wrap It Up
Transferring music from iPhone to computer free is no longer a hassle with these methods above! With the help of any of the above-stated methods, you can quickly transfer music from iPhone to Mac or PC in a couple of minutes. But if you are looking for a professional tool that can serve you with more features along with transferring music from iPhone to computer without iTunes, then UltFone iOS Data Manager is the best choice. So, what are you waiting for? Download UltFone iOS Data Manager free now, and be sure to have hassle-free music transferring experience.


