UltFone iOS System Repair is a professional iOS system recovery tool that contains three major features: Enter & Exit Recovery Mode, Reset Device and Repair Operating System. With UltFone iOS system repair tool, you can put any iPhone/iPad/iPod touch into or out of recovery mode with only one click. And if your iDevice gets stuck in recovery mode or stuck on Apple logo/reboot loop/black screen, it'll empower you to fix not only these but also other 150+ iOS system issues/errors/stuck without any data loss.
Follow this guide to learn how to exit/exit recovery mode and repair iOS system.
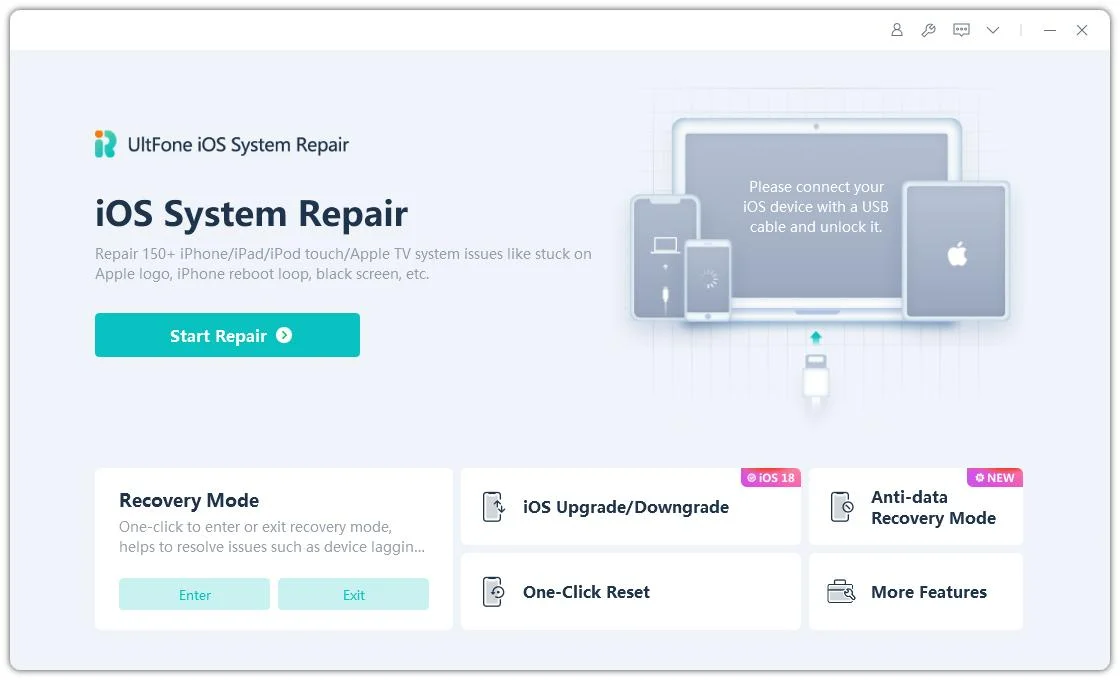
Part 1: 1-Click to Enter/Exit Recovery Mode
1-Click to Enter Recovery Mode
Need to put your iPhone/iPad/iPod in recovery mode but have no idea about how to implement it? Can't enter/exit recovery mode because the Home or Power button in your iDevice is broken? Here UltFone iOS System Repair comes to empower you to enter or exit iOS recovery mode by only one click with no need to press any buttons.
iPhone/iPad/iPod recovery mode, which presents a Connect to iTunes message on the screen, is a situtaion that can happen during/after an iOS update/jailbreak. Let's see how to put an iDevice in recovery mode with iOS System Repair free.
Step 1: Upon downloading and installing iOS System Repair on your PC/Mac, please launch the program and connect your iPhone/iPad/iPod touch to computer with a lightning cable.
Select Enter Recovery Mode option from the main interface.
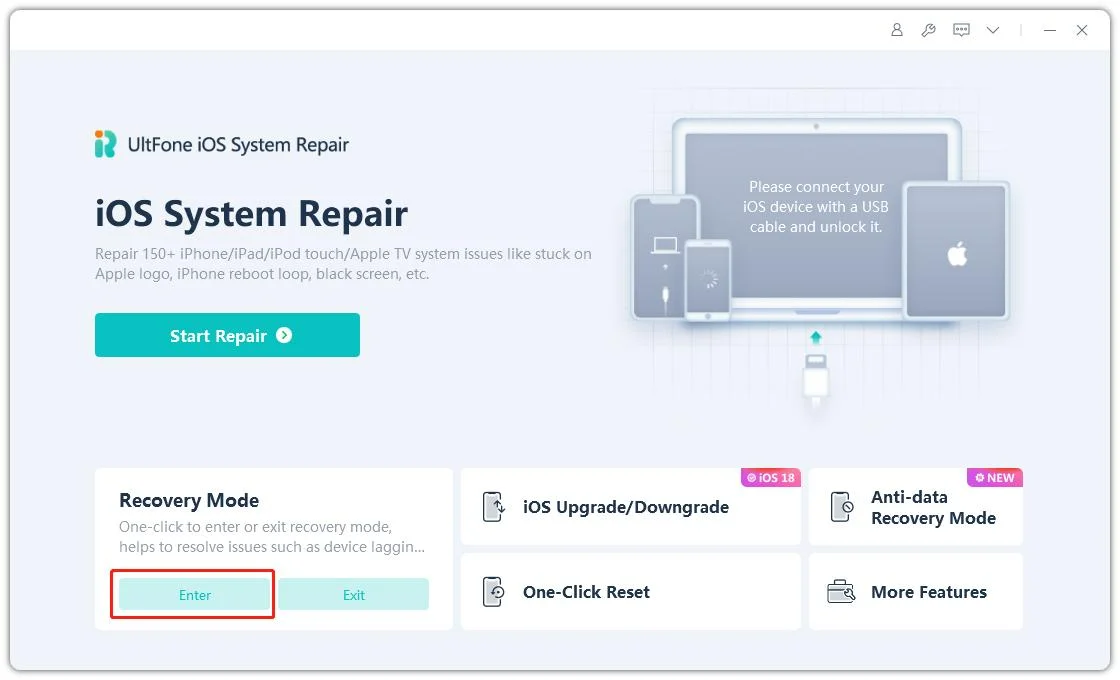
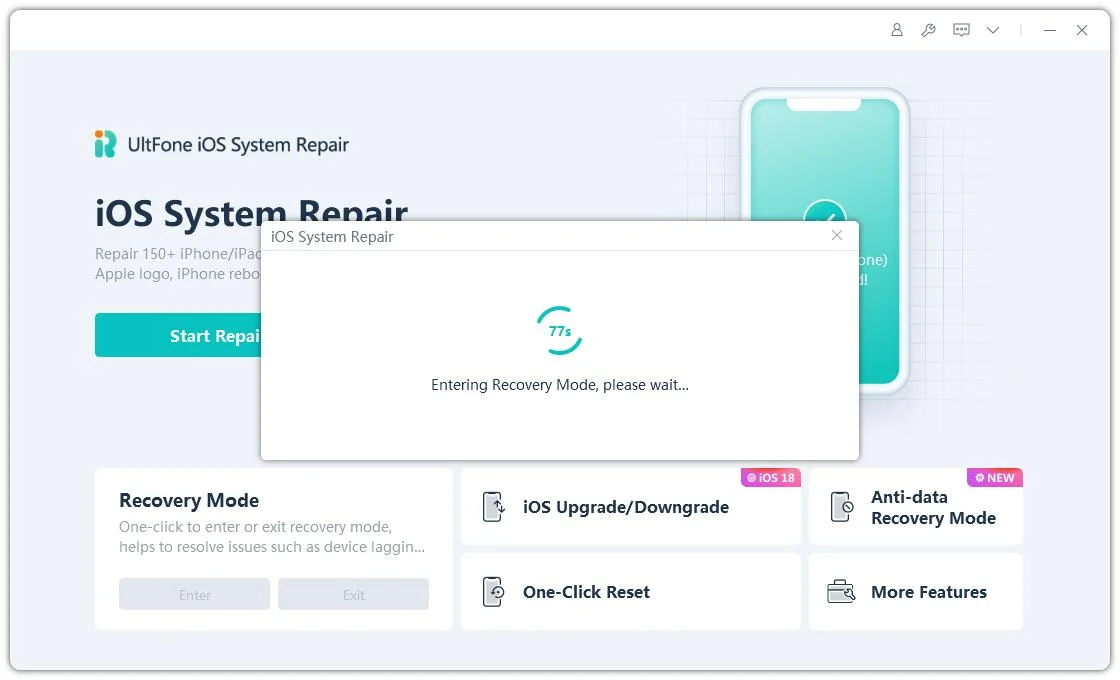
Step 2: Click on the Enter button to put your iPhone, iPad or iPod touch in recovery mode. After a 10-sec wait, you will see your device display the classic USB to iTunes logo. Congratulations! Your device has entered the recovery mode successfully.
1-Click to Exit Recovery Mode
iPhone gets stuck in recovery mode after updating to a new firmware or when you are trying to restore a backup? UltFone iOS System Repair allows you to fix iPhone/iPad/iPod touch stuck in recovery mode with only 1-click.
Step 1: Connect your iPhone/iPad/iPod touch to computer, and launch iOS System Repair. Select the Exit Recovery Mode feature from the main interface.

Step 2: Click on the Exit button and wait for 10 seconds or so.

Step 3: After a while, your iPhone/iPad/iPod will reboot and get out of recovery mode successfully.

Part 2: How to Repair iOS System without Data Loss
Let's now move on to the iOS System Repair module. This module turns you into a pro user as you can efficiently and effortlessly resolve almost any of the iOS firmware related issues of iDevices, such as iPhone stuck in recovery mode/DFU mode during an iOS update/jailbreak, iPhone won't turn on or charge, iPhone screen unresponsive after update, etc. You can fix most of these iOS problems after a factory reset or tedious iTunes restore, whereas, by doing so, you have to bear losing all files in your device and the procedures can be super complicated for beginners.
Now with UltFone iOS 26 System Repair, you can easily repair these iOS system issues without data loss in only a few clicks. Let's learn how it works right now!
Step 1: Download and Launch UltFone iOS System Repair
Download and launch this program on your PC/Mac, then connect your iPhone/iPad/iPod touch to the computer. Click "Start" to enter the iOS system repair module.

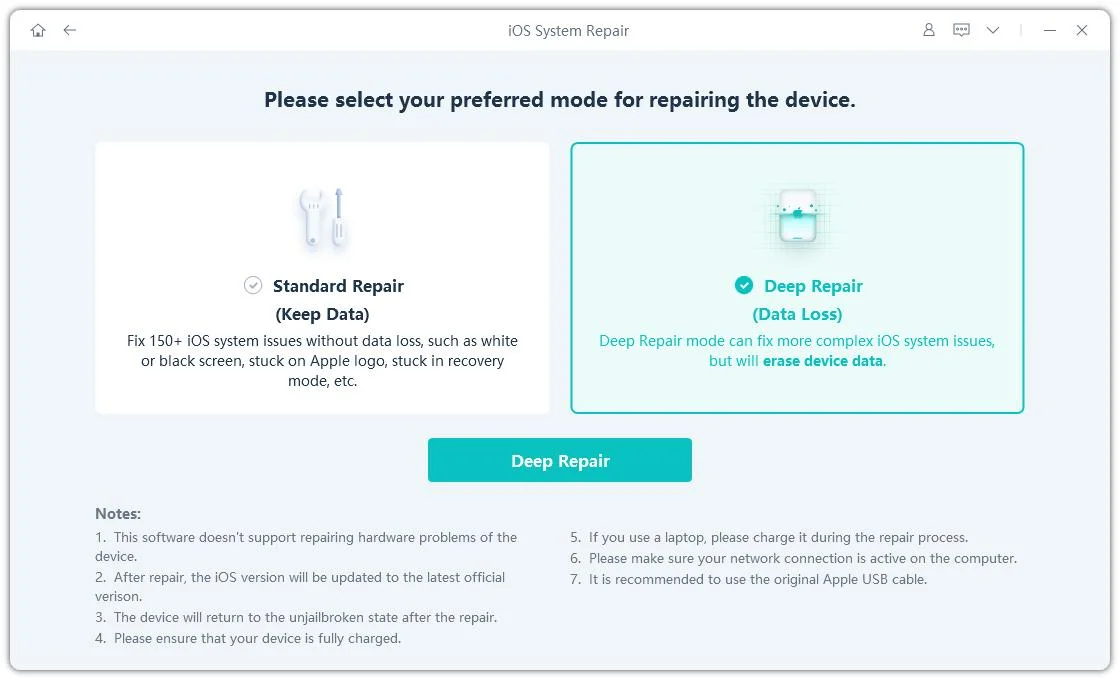
Step 2: Select Standard Repair
On the following screen, click "Standard Repair" to proceed.

Notes:
1. If your iDevice can't be detected, this program will guide you to put your device in recovery mode or DFU mode manually to get it detected.


2. As we can see on the interface that there're two repair modes available: Standard Repair and Deep Repair. The only difference between them is that with the Standard Repair, the iOS issues can be resolved without any data loss. On the other hand, the Deep Repair mode will wipe off everything on your device and help you to resolve more serious iOS issues that were just not fixed by the Standard Repair option. If the Standard Repair mode doesn't fix your problem, or you'd like to factory reset iPhone/iPad without password, please choose the Deep Repair mode.
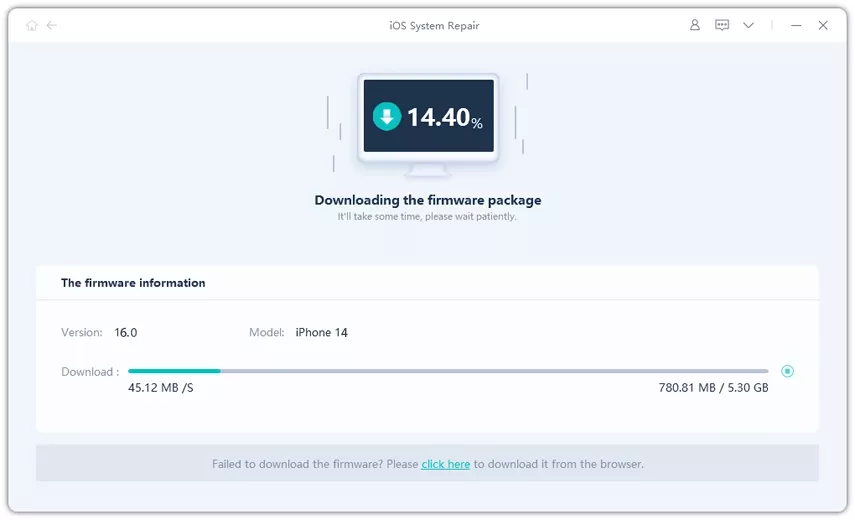
Step 3: Download Firmware Package
Before performing the system repair, you need to click the "Download" button to download the automatically matched firmware package for your device. You can change the saved path by clicking "Browse" to select another location to store firmware package.

Notes:
If you have already downloaded the firmware before, please click "import local firmware" to import your firmware package.

The firmware package is about 2.5 GB, so please wait patiently and keep the Internet environment around you good.
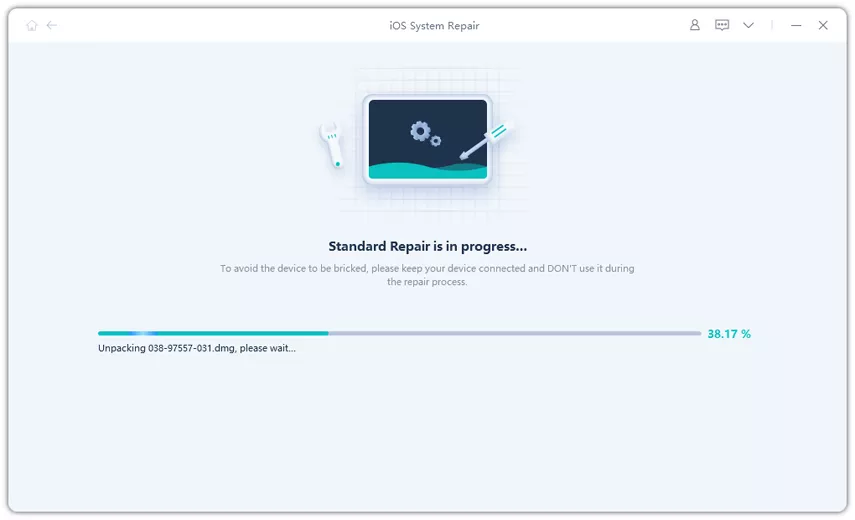
Step 4: Start Repairing Operating System
After the firmware package is downloaded successfully, please click "Start Standard Repair" to fix the iOS issues on your device.

Wait for a few minutes to repair iOS system.
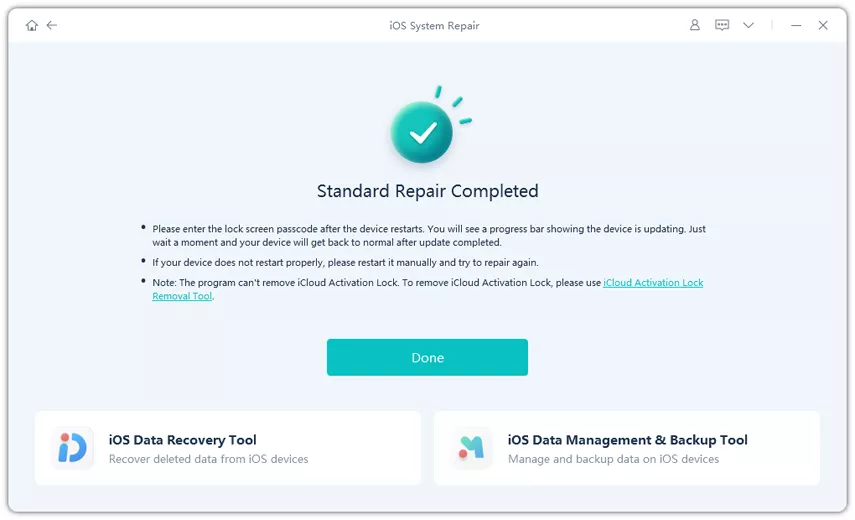
Step 5: Done with the iOS System Repair
When the iOS system recovery is done, your iOS device will automatically reboot and everything will get back to normal.
Part 3: Reset iPhone/iPad/iPod
Factory Reset iPhone/iPad/iPod without Password
Your iPhone is diabled and cannot turn on anymore? Or you want to restore iPhone but iTunes failed to do that? No worries, with the "Factory Reset" function on UltFone iOS System Repair, you can directly reset iPhone to factory settings without using iTunes or iCloud. Here's how to do it:
Step 1: Run the program and choose "Reset Device" option at the bottem right of the main interface.

Step 2: Then you'll see a new screen, Select "Factory Reset" and click on the "Factory Reset" button to enter the firmware download page.

Step 3: Now you'll need to download the matched firmware package for you before resetting. You are also allowed to import the firmware package manually.

Step 4: Once the firmware package is downloaded, you can start resetting your device. When the process completes, set up your iPhone as new.

General Reset iPhone/iPada/iPod
General Reset feature will help you return iPhone/iPad/iPod settings to their defaults and resolve some minor glitches, like network not working, notification not working etc.
Step 1: Select "General Reset" and click on the "General Reset" button to enter the firmware download page.

Step 2: Follow the on-screen instructions to reset your device according to your needs.

Part 4: Downgrade iOS/iPadOS
UltFone iOS System Repair provides downgrading iOS system mode, while it will erase all data on your device. Thus, it’s important to back up data before using downgrade features.
This guide mainly introduce how to downgrade from iOS 26 with Downgrade mode. You need to download and install UltFone iOS System Repair on your computer first, then follow the steps below.
Step 1. Connect iPhone to Computer
Run UltFone iOS System Repair on your computer and connect iPhone to computer. Once the device is connected, click “iOS Upgrade/Downgrade” at the bottom left of the panel.

Step 2. Choose Downgrading System Option
Since it is a ios version, you should choose Downgrading System mode. Then, click the button below.

- Downgrading System supports to downgrade between the major version, including iOS downgrade. For example, downgrade iOS 26 to 18.
Step 3. Download Firmware Package
UltFone iOS System Repair will detect your iOS version automatically and display the downgradable iOS firmware. Click “Download” to get the package.

- · If you failed to download the firmware, just hit the ‘click here’ to download it through browser.
- · If you've already have a firmware on computer, just click "import local file" to import the firmware manually.
It may take a few minutes to download the firmware.

- Unsigned IPSWs cannot currently be restored via UltFone iOS System Repair. If the iOS version is not supported to downgrade, the program will prompt that no downgradable iOS firmware found.
Note:

You can visit the IPSW website to check which firmware Apple is signing.
Step 4. Initiating Downgrade
Once the firmware package is downloaded on your computer, you can click 'Initiating Downgrade' to downgrade iOS/iPadOS.

iOS Downgrade will cause all data and settings loss, please make sure that you have made a backup before. If confirmed, then click “Continue” button.

Step 5. Downgrading
The program starts to downgrade iOS/iPadOS, please do not disconnect your device during the downgrade process.

When the downgrade is completed, you will see the completed page and your iPhone/iPad will go back to the previous version.

Part 5: Upgrade iOS/iPadOS
With UltFone iOS System Repair, you can be sure that your iPhone will be updated to the latest version with ease and without any risk of data loss or damage to your system. Here is how to update your iOS without a hitch.
Step 1. Connect iPhone to Computer
Run UltFone iOS System Repair on your PC or Mac and connect your iPhone to the computer. Once the devices are connected, click “iOS Upgrade/Downgrade” at the bottom left of the panel.
Step 2. Choose Upgrade Option
No matter version or final version, you should choose "Upgrade" mode. Then, click the button below.

Step 3. Download Firmware Package
UltFone iOS System Repair will detect your iOS version automatically and display the upgradable iOS firmware. Click “Download” to get the package.

- If you failed to download the firmware, just hit the ‘click here’ to download it through browser.
- If you've already have a firmware on computer, just click "import local file" to import the firmware manually.
It may take a few minutes to download the firmware.

Note:
Unsigned IPSWs cannot currently be restored via ReiBoot. If the iOS version is not supported to upgrade, the program will prompt that no downgradable iOS firmware found.
- You can visit the IPSW website to check which firmware Apple is signing.
Step 4. Initiating Upgrade
Once the firmware package is downloaded on your computer, you can click 'Initiating Upgrade' to update iOS.
Initiating Upgrade will not clear your data. If confirmed, then click “Continue” button.
Step 5. Upgrading
The program starts to update iOS, please do not disconnect your device during the upgrade process.
When the upgrade is completed, you will see the completed page and your devices will be the newest version.
Part 6: Fix macOS system
Standard Repair: Fix macOS Stuck Issues without Data Loss
Step 1: Download and Install UltFone iOS System Repair on Normal Mac
Run UltFone iOS System Repair on your normal mac computer and connect it to the computer that needs to be repaired. Once the device is recognized, click 'Repair macOS system issues' button to use macOS System Recovery tool.
- Note:
- To repair macOS system successfully, it's highly recommended that you connect the the two macOS device using the Apple original lightning USB cable.
Step 2: Click 'Standard Repair' to Proceed
In the below interface, select 'Standard Repair' and read the note below to avoid repairing process failure. If you're ready, click 'Standard Repair'.
Step 3: Enter into DFU Mode
Select the model of the mac computer you need to be repaired and follow the instructions on the screen.
- Note:
- If your device can't be detected, please make sure that the model you have selected corresponds to your device model, and follow the instructions to put your computer into DFU mode.
Step 4: Download Firmware Package
If you're ready, click 'Download' to download the latest firmware package. It will take some time due to about 12GB firmware package.
If you failed to download the firmware package, you can download it through browser by hit 'click here'.
If you've already downloaded the firmware package on computer, just click "import local file" to import the firmware manually.
Step 5: Start Standard Repair
Once the firmware package is downloaded on your computer, you can click 'Start Standard Repair' to start system recovery.
The whole repair process will take a few minutes, please wait patiently.
After the repair is done, your macOS device will automatically reboot and all your data will not be erased.
- If your Mac models is with the Apple T2, before repairing done, you should follow the instructions below steb by step:
- After you finished all the steps, please click the "Done" button and your Mac with Apple T2 will be repaired successfully without data loss.
Note:
Deep Repair: Fix macOS System Issues with a Higher Success Rate
Deep Repair can fix more serious macOS system issues with a higher success rate but it will cause data loss. So when Standard Repair fails repair, you can take Deep Repair for a try.
Step 1: Download and Install UltFone iOS System Repair
Download and run UltFone iOS System Repair, connect your two Mac devices via a USB cable.
Step 2: Click "Deep Repair"
In the following interface, select "Deep Repair" and read the note below carefully. If there"s no problem, please click "Deep Repair".
Step 3: Enter into DFU Mode
Select the model of the mac computer you need to be repaired and follow the instructions on the screen.
- Note:
- If your device can"t be detected, please make sure that the model you have selected corresponds to your device model, and follow the instructions to put your computer into DFU mode.
Step 4: Download Firmware Package
Now, you can start downloading firmware package by pressing "Download" button and it will take a few minutes.
Step 5: Start Deep Repair
Now, the firmware package has been downloaded, click "Start Deep Repair" to start repairing.
Deep Repair will cause all data and settings loss. If the device can operate, you can back up data first and then try again. If not, just click "Repair" to proceed.
After a while, your device will be repaired successfully, just to check if your device goes back to normal.
- Note:
- If your Mac models is with the Apple T2, before repairing done, you should follow the instructions below steb by step:
- After you finished all the steps, please click the Done button and your Mac with Apple T2 will be repaired successfully.
Part 7: Downgrade macOS
If you want to revert your Mac to a previous version due to compatibility issues, UltFone iOS System Repair is the best bet for you. It provides a hassle-free solution that saves time and effort. With just a few clicks, you can downgrade your macOS version, and UltFone iOS System Repair will handle the rest.
This guide mainly introduce how to downgrade your Mac devices. You need to download and install the UltFone iOS System Repair on your computer first, then follow the steps below.
Step 1. Connect Both Mac Devices
Run UltFone iOS System Repair on your computer and connect both Mac devices. Once the devices are connected, click “More Features” at the bottom left of the panel.
Step 2. Choose Downgrading System Option
No matter version or final version, you should choose Downgrading System mode. Then, click the button below.
Step 3. Enter into DFU Mode
Follow the instructions below to put your mac into DFU mode. The methods are different from models, please make sure you choose the right model.
Step 4. Download Firmware Package
UltFone iOS System Repair will detect your macOS version automatically and display the downgradable macOS firmware. Click “Download” to get the package.
· If you failed to download the firmware, just hit the ‘click here’ to download it through browser.
· If you've already have a firmware on computer, just click import local file to import the firmware manually.
It may take a few minutes to download the firmware.
- Note:
- Unsigned IPSWs cannot currently be restored via UltFone iOS System Repair. If the macOS version is not supported to downgrade, the program will prompt that no downgradable macOS firmware found.
Step 5. Initiating Downgrade
Once the firmware package is downloaded on your computer, you can click 'Initiating Downgrade' to downgrade macOS.
Initiating Downgrade will cause all data and settings loss, please make sure that you have made a backup before. If confirmed, then click “Continue” button.
Step 6. Downgrading
The program starts to downgrade macOS, please do not disconnect your device during the downgrade process.
When the downgrade is completed, you will see the completed page and your mac devices will go back to the previous version.
Part 8: Upgrade macOS
Whether you want to update to the latest macOS version or revert to a previous version due to compatibility issues, UltFone iOS System Repair provides a hassle-free solution that saves time and effort. With just a few clicks, you can upgrade your macOS version, and UltFone iOS System Repair will handle the rest.
This guide mainly introduce how to update your Mac devices. You need to download and install the UltFone iOS System Repair on your computer first, then follow the steps below.
With UltFone iOS System Repair, you can be sure that your Mac will be updated to the latest version with ease and without any risk of data loss or damage to your system. Here is how to update your macOS Update macOS without a hitch.
Step 1. Connect Both Mac Devices
Run UltFone iOS System Repair on your computer and connect both mac devices. Once the devices are connected, click “More Features” at the bottom left of the panel.
Step 2. Choose Upgrading System Option
No matter version or final version, you should choose "Upgrading System" mode. Then, click the button below.
Step 3. Enter into DFU Mode
Follow the instructions below to put your mac into DFU mode. The methods are different from models, please make sure you choose the right model.
Step 4. Download Firmware Package
UltFone iOS System Repair will detect your macOS version automatically and display the upgradable macOS firmware. Click “Download” to get the package.
· If you failed to download the firmware, just hit the ‘click here’ to download it through browser.
· If you've already have a firmware on computer, just click "import local file" to import the firmware manually.
It may take a few minutes to download the firmware.
- Note:
- Unsigned IPSWs cannot currently be restored via UltFone iOS System Repair. If the macOS version is not supported to upgrade, the program will prompt that no upgradable macOS firmware found.
Step 5. Initiating Upgrade
Once the firmware package is downloaded on your computer, you can click 'Initiating Upgrade' to update macOS.
Initiating Upgrade will not clear your data. If confirmed, then click “Continue” button.
Step 6. Upgrading
The program starts to update macOS, please do not disconnect your device during the upgrade process.
When the upgrade is completed, you will see the completed page and your Mac devices will be the newest version.
- Note:
- If your Mac models is with the Apple T2, before repairing done, you should follow the instructions below steb by step:
- After you finished all the steps, please click the "Done" button and your Mac with Apple T2 will be upgraded successfully.
Part 9: Backup & Restore iPhone & iPad
How to Backup Data on Your iPhone & iPad
- Step 1 Install and Launch UltFone iOS System Repair
- Step 2Select Data Backup
- Step 3Initiate Backup
- Step 4Enter Backup Password
- Step 5Backup in Progress
- Step 6Backup Completion
Download and install UltFone iOS System Repair on your PC or Mac. Launch the software and connect your iPhone via a USB cable. Once the device is detected, select the "Data Backup/Restore" option to manage your iPhone data.
To ensure a successful iOS system repair, it is strongly recommended to connect your iOS device to the computer using the original Apple Lightning USB cable.
On the main interface, choose the "Data Backup" option. Refer to the user guide to ensure all requirements for the tool to function correctly are met.
The software will display details such as device name, model, iOS version, and available storage. Click "Start Backup" to begin the backup process.
It’s best to avoid saving backup files to the C drive, as they are often large and can quickly consume valuable system storage space.
If your device has a backup password, enter your lock screen passcode to unlock it. If no password is set, UltFone iOS System Repair will assign a default backup password, which does not require unlocking.
Once configured, the backup process will begin, and a progress bar will appear. Please wait patiently for the backup to complete.
During the backup process, you might be prompted to enter your device’s lock screen passcode—please unlock it when requested. Also, make sure not to disconnect your device while the backup is in progress.
After the backup is finished, click "View" to review your backed-up data or "OK" to return to the main interface.
How to Restore Data on Your iPhone & iPad without iTunes/iCloud
- Step 1Install and Launch UltFone iOS System Repair
- Step 2Select Data Restore
- Step 3Restore to Device
- Step 4Restoring Backup
- Step 5Restore Completion
Download and install UltFone iOS System Repair on your PC or Mac. Open the software and connect your iPhone to your computer using a USB cable. On the main screen, select the "Data Backup/Restore" option to proceed.
Choose the "Data Restore" option from the main interface. Review the user guide to ensure you understand the tool’s requirements for proper operation.
You can view all backup files stored on your PC, including details such as device name, model, iOS version, backup time, size, and encryption status. UltFone iOS System Repair can automatically detect iTunes backups or allow you to manually import third-party backup files. Select a backup and click "Restore to Device" to initiate the restore process.
You’ll receive a notification indicating that restoring may overwrite the existing data on your device. Please confirm to proceed and make sure you’ve backed up any important information in advance. Also, be sure to disable Find My iPhone on your device before starting the restore process.
The restore process will begin. Ensure your device remains connected to the computer, as disconnecting it during the process may lead to system issues or data corruption.
Once the restore process is complete, your device will restart and be ready for use.