How to Create a Windows 7 Boot Disk in Case of System Errors
 Jerry Cook
- Updated on 2020-10-26 to Windows
It is necessary to have an emergency Windows boot disk on hand. This boot disk, also known as system-repair disc, allows you to use the system recovery options on start-up if your computer fails to boot to the system, due to a corrupted or missing system file. However, some manufacturers no longer include such a Windows 7 boot disc. If this is the case, you should create your own boot disk by yourself.
Fortunately, Fix Genius allows you to create a Windows 7 boot disk (it also be used as Windows 8 boot disk, Windows Vista boot disk, or Windows XP boot disk), boot your computer directly from this disk as opposed to from the operating system stored on the hard drive, and perform operations such as crash repair, system restore, and etc in the event that your operating system fails. It can repair boot-up and other system problems you may be experiencing.
Here is a step-by-step tutorial about how to use Fix Genius to create a Windows 7 boot disk. If you just want to a boot disc to have on hand in case the Windows boot fails, you can take Step 1 only for reference. If you are confronting a computer boot issue, keep on reading the whole instructions.
How to Create a Windows 7 Boot Disk?
Step 1: Burn a Windows 7 Boot Disk
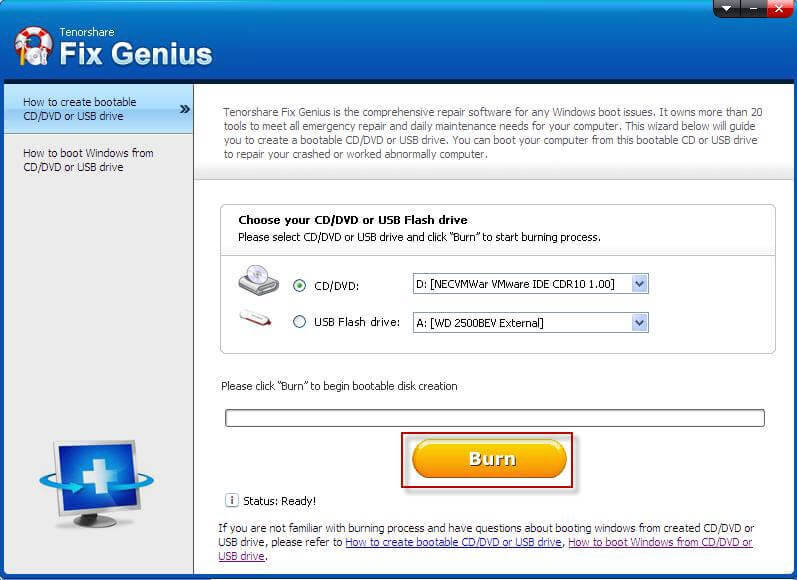
Insert a blank disc to your computer. As long as your optical drive supports it, this disc can be a CD, DVD or USB flash drive since Fix Genius supports them all. Launch this software, and you only need to click "Burn"to start ISO file burn. Depending on how large the ISO file is, and how fast your disc burner is, the Windows 7 boot disk burning process could take anywhere from several seconds, to several minutes, to complete. If you just need to create a Windows 7 boot disc, you can stop here. If you have booting issues, go ahead.

Step 2: Boot System from CD
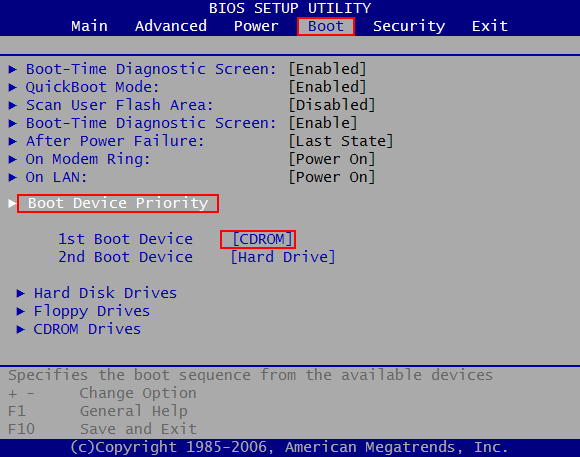
Change the boot order to set CD as the first boot device. Otherwise, it will boot the computer from hard drive. After setting BIOS to boot from CD, the computer will automatically boot and access to CD.

Step 3: Fix all System Problems
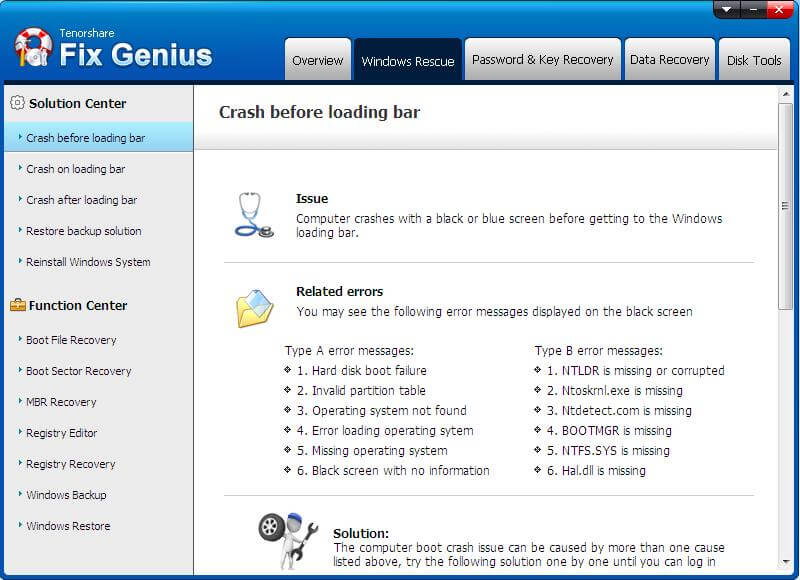
Wait until you load to the system successfully, and it will take you about half a minute. Select "Windows Rescue"and then go to "Solution Center". This software provides several different Windows crash solutions with detailed symptoms descriptions. Under each solution, there are related Windows rescue tools. Choose the solution that is right describing the issue that your computer encounters and go to fix it.

Of course, the process of creating Windows XP boot disk, Windows Vista boot disk and Windows 8 boot disk is the same.


