UltFone iOS Data Manager is an ideal iTunes alternative tool to backup iPhone to computer free, sync iPhone files with iTunes without limitation, and transfer files between iOS device and computer easily.
Install this iPhone backup and transfer tool to your computer, and get started to use this software to manage your iOS device.
Manage Files
Step 1: Connect Device and Select "Manage" from menu to start.

Step 2: Manage Files
You can choose to import and export photos/music/ringtones/videos/contacts/books/bookmarks, uninstall apps, de-duplicate contacts, add playlist/contacts as you need.
Import Files
To import files from computer to iOS devices, click "Import" button and select the files you'd like to add. You can also directly import folders as the picture below shows.

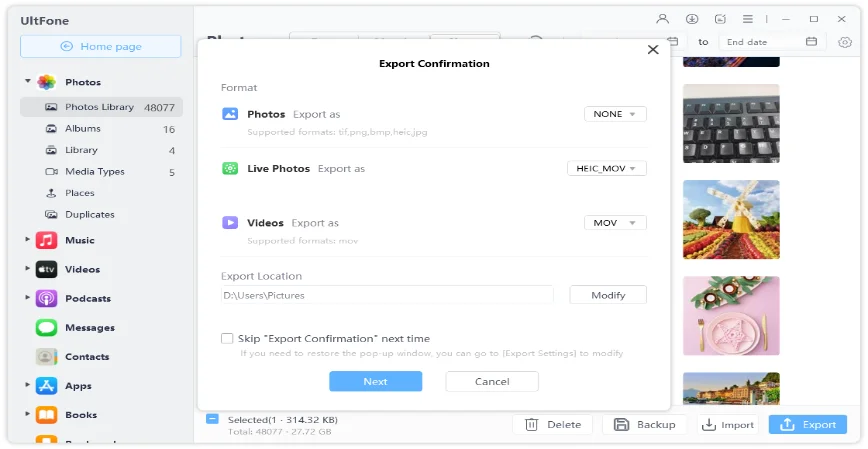
Export Files
To get files off iPhone/iPad or iPod, just hit the "Export" button and select a location to save these files. You can also define export setting for HEIC/Live photos and HEVC videos.
Add Files
You can add contacts, books and bookmarks by UltFone iOS Data Manager and all the changes made will be synced to your iDevice. Simply click the "Add" button to add contacts and "Import" button to add other files.

Delete Files
UltFone iOS Data Manager enables you to quickly delete unwanted files and instantly free up storage space. Just select the files you don't need any more and click "Delete" button.

Merge Contacts
If there are duplicated contacts on your device, you can click "Merge" button to delete one of them.

Virtual USB Drive
Now, UltFone iOS Data Manager makes it possible to create a virtual USB flash drive on your device to manage iOS files smartly. You can create your own folders and manage the data within the folders freely in the virtual USB drive.
An import tip: The virtual USB flash drive also occupies the device storage; therefore, you need to make sure that there is enough free space on your device.
Now, let’s see how easy it is to create your own folder with the help of iOS Data Manager.
On the Manage tab of this software, choose Virtual USB Drive from the sidebar. Here you can do these things:
1. Create Folders
You can create any folder as you like in this section and them add files to these folders as you like. To create a folder, just right-click or choose “New Folder” from the top menu.

2. Import Files to Virtual USB Drive
To import files to the virtual USB drive, just select the target folder and then click the Import button from the top menu. Select files from the computer that you want to import and wait for the process to complete.

3. Export Files from Virtual USB Drive
You can also export files from the virtual USB drive. Tick the folders or files that you want to export and click the Export button on the top menu to save them to computer.

4. Delete Files from Virtual USB Drive
To delete a file or multiple files from the virtual USB drive, you just need to select the file(s) and click the Delete button to confirm your choice.

File Manager Feature
The new feature – File Manager allows users to view and manage (view, import, export, delete) folders in your iOS device. Switch to the File Manager feature, UltFone iOS Data Manager will display the folders that already exit in your device. You can click a folder to view the file(s) within the folder. Right click a folder or file, you can open, rename, export or delete the selected file/folder.

You can choose a folder and then click the Import button from the top menu, it allows you to import file or folder from computer to the selected folder.

To create a new folder, click the New Folder option from the top menu. You can rename the new folder as you like.

You can delete a folder or file as you like in the File Manager. Just highlight the file or folder and click the Delete button.

Backup and Restore
Backup iPhone/iPad/iPod to PC/Mac (Free Feature)
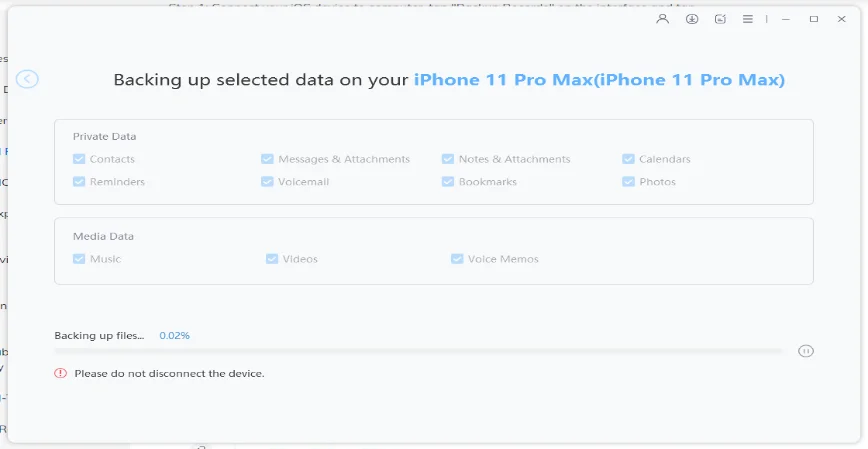
Step 1: Connect your iOS device to computer, tap "Backup Records" on the interface and tap "Backup & Restore". Then you'll see the interface with all files are selected by default, but you can also selectively choose files for backup.

Step 2: Click "Backup" button and it will start backing up the selected data on your iPhone/iPad/iPod.
Step 3: After the backup process, you can view backup data or view backup list.


Restore iPhone/iPad/iPod from Backup
Step 1: Connect your iOS device to computer, and click "To view or restore previous backup files" on the left bottom.
Step 2: The program will display backup files you created both with iTunes and with UltFone iOS Data Manager. Choose a previous backup you want to restore and click "View".

Step 3: UltFone iOS Data Manager will extract all files from the selected backup. You can choose the data you want to restore and click "Restore to Device" or "Export to Computer".

Step 4: Please wait patiently while restoring data to your device.

Step 5: Now, your backup files have been restored to your device successfully!

Convert HEIC to JPG
Step 1: Connect iDevice
Download and install UltFone iOS Data Manager on your Mac/PC and connect your iPhone/iPad/iPod to the computer with a USB cable. Make sure that the iOS device is unlocked. After the connection, find this tool, HEIC Converter in Quick Access of the surface page and use it. If you can't find it here, you can click the button on the right of Quick Access, enter More Tools page and set this tool to Selected..

Step 2: Add HEIC Photo(s)
Click “Add Photos(s)” on the pop-up screen and tap on “Select Photo(s)” or “Select Folder” based on the number of photos. “Select Folder” is recommended if you have hundreds of HEIC photos need to convert.

If you want to add more photos, click “Add Again” button on the top left corner. Please note that the maximum is 1,000 photos at a time. If you want to delete photo(s), click “Remove” button. Moreover, click “Clear List” on the top left corner to delete all selected photos.

Step 3: Start Converting
Before converting, UltFone program will save the converted photos on the desktop but you can also change the save location by simply clicking “Change” option. After doing this, select “Convert to JPG”.

Step 4: Finish Conversion
When the conversion is finished, the save location will be shown on the screen. If not, click “Open Folder” to find the converted JPG photos.

One-click Exporting Photos to PC/Mac
Connect Device and Start Exporting
Tap "Export Photos", choose a folder to save your photos, then all the photos on your device will be transferred to your computer.

Transfer Device Media to iTunes
Connect Device to Transfer Media Files to iTunes
Find this tool, Transfer Device Media to iTunes in Quick Access of the surface page and use it. If you can't find it here, you can click the button on the right of Quick Access, enter More Tools page and set this tool to Selected.


Transfer iTunes Media to Device
Connect Device to Transfer iTunes Media Files to Device
Find this tool, Transfer iTunes Media to Device in Quick Access of the surface page and use it. If you can't find it here, you can click the button on the right of Quick Access, enter More Tools page and set this tool to Selected.

Enable/Disable Device Accessibility
Step 1: Connect iDevice
Download and install UltFone iOS Data Manager on your Mac/Windows and connect iPhone/iPad to the computer via a USB cable. Unlock your iDevice and enter the passcode if “Trust This Computer” pops up. After the connection, find this tool, Device Accessibility Control in Quick Access of the surface page and use it. If you can't find it here, you can click the button on the right of Quick Access, enter More Tools page and set this tool to Selected.

Step 2: Enable/Disable Device Accessibility Features
Now you can choose to enable or disable Device Accessibility features on your own.
- AssistiveTouch: This feature helps you use your iPhone in an easy way when you have difficulty touching the screen. When it is enabled, a button will appear on your iDevice screen and you can lock the screen, take screenshots or others via this button.
- VoiceOver: It will speak items on the screen if enabled so that you don’t need to see the screen.
- Zoom: This feature allows you to zoom in on everything on the iDevice screen without restriction.
- Invert Colors: This feature allows you to view the screen display against a dark background.

iPhone Real-Time Screen
Step 1: Launch UltFone iOS Data Manager on your computer and connect your iPhone to your PC/Mac with a data wire. Find this tool, Real-Time Screen in Quick Access of the surface page and use it. If you can't find it here, you can click the button on the right of Quick Access, enter More Tools page and set this tool to Selected.

Then, UltFone will start to load the plugin. It just takes a few seconds.

Step 2: After finishing loading the plugin, your iPhone screen will appear.

Step 3: You can click any app on your iPhone and take a screenshot. On the right side, more choices are shown to you: you are allowed to save screenshots to local, copy screenshots to clipboard and do a full screen. Also, it is your option to choose where you want to save the screenshots simply by clicking the “Change” button.

Also, you can choose to rotate the screen and then take a screenshot. After that, click the “Open” button to check your screenshots.

Run A Test Report for iPhone
Step 1: Launch UltFone iOS Data Manager on your computer and then connect your iPhone to computer with a USB cable. Select “Test Report” on the main screen.
Step 2: Then, a test report about your iPhone will show you. This report will include the basic infomation about your iPhone such as device name, hard disk capacity, front camera and charge times,etc. Moreover, it will conclude whether your iDevice has been disassembled or not.

Block iOS Updates
Step 1: On your computer, download and install UltFone. Then use a data cable to connect your iPhone and computer. After connection, find this tool, Block iOS Updates in Quick Access of the surface page and use it. If you can't find it here, you can click the button on the right of Quick Access, enter More Tools page and set this tool to Selected.

Step 2: Choose “Send profile to device” on the pop-up window. Please ensure that your iPhone is unlocked.

Step 3: Open the “Settings” app on your iPhone, click “VPN & Device Management” and then install the ”tvOS 15 Beta software profile”.

Step 4: Next, restart the iPhone. Then a “Feedback” icon will appear on your screen. Please note that you are not allowed to delete it but can hide it. It means that you have succeeded in turning off iOS automatic updates. Once Apple releases a new iOS version in the future, you won’t get the iOS update prompt anymore.

Enable Developer Mode
Step 1: Launch UltFone iOS Data Manager on your Windows/Mac, and connect your iPhone to your computer with a data wire. Find this tool, developer mode in Quick Access of the home page and click it.
![]()
If you can't find it here, you can click the button on the right of Quick Access, enter More Tools page and set this tool to Selected.
Step 2: Then, tap on the “Open” option on the pop-up window after you click the tool, developer mode.
![]()
Step 3: The developer mode entry has been displayed, tap on the "Next" option to turn on developer mode on your iPhone.
![]()
Step 4: Pick up your iPhone and navigate to Settings, click the “Privacy & Security” option.
![]()
Step 5: Scroll down until you find the “Developer Mode” and toggle the button on the next screen.
![]()
Next, select “Restart” on the pop-up window.
![]()
Step 6: When your iPhone is restarted, a tip will show up to ask you “Turn On Developer Mode?”, select “Turn On” and then enter your passcode.
![]()
Now, your iPhone is in developer mode and you can enjoy UltFone features.
Hope this tutorial is helpful. Download UltFone iOS Data Manager now and try to manage your iPhone free without iTunes!